Serverless ETL For Data Analytics
I recently started collecting data on reservation events for Fire Lookout Towers booked via Recreation.gov as part of my side project Tower Scouter. This post explores my first attempts in using AWS Glue, Amazon Athena, and Amazon SageMaker services for a fully managed ETL and analytics pipeline to really geek out on fire lookout reservation trends and patterns.
The Event Data
I have a Serverless Web Scraper running that publishes an event to an S3 bucket every time there is a addition or removal in availability for a lookout tower. A sample availability removal event looks something like this:
{
    "date": "2019-02-20",
    "parkId": 234185,
    "detected": "2018-10-17T05:11:23.003528+0:00",
    "event": "rm"
}
In this case, an availability on Feb 20, 2019 for Drake Peak Lookout was removed (e.g. booked by a user) on Oct 17th, 2018.
A sample availability addition change event looks like this:
{
    "date": "2019-03-20",
    "parkId": 72017,
    "detected": "2018-09-20T23:51:22.727807+00:00",
    "event": "add"
}
In this case on Sept 20, 2018 an availability for Timber Butte Cabin became available for the night of March 20. This is a very typical event as fire lookout towers become available on Recreation.gov six months in advance.
For every detected change in availability a new S3 Object with this JSON is stored for future analytics.
Exploring the Data with Athena
Amazon Athena provides a way to run interactive SQL queries on data stored in S3 without ever having to provision a database. JSON is supported out of the box so this is a perfect use case for Athena. This is all powered under the hood by the open source Presto project.
Athena was easy to quick start: I entered the service in the AWS Console, pointed Athena to the S3 bucket where my analytics data resides, defined what the schema of my JSON looks like, and then tried running a SELECT * statement but quickly ran into
2 issues.
First Issue: Timestamp is in ISO8601 format
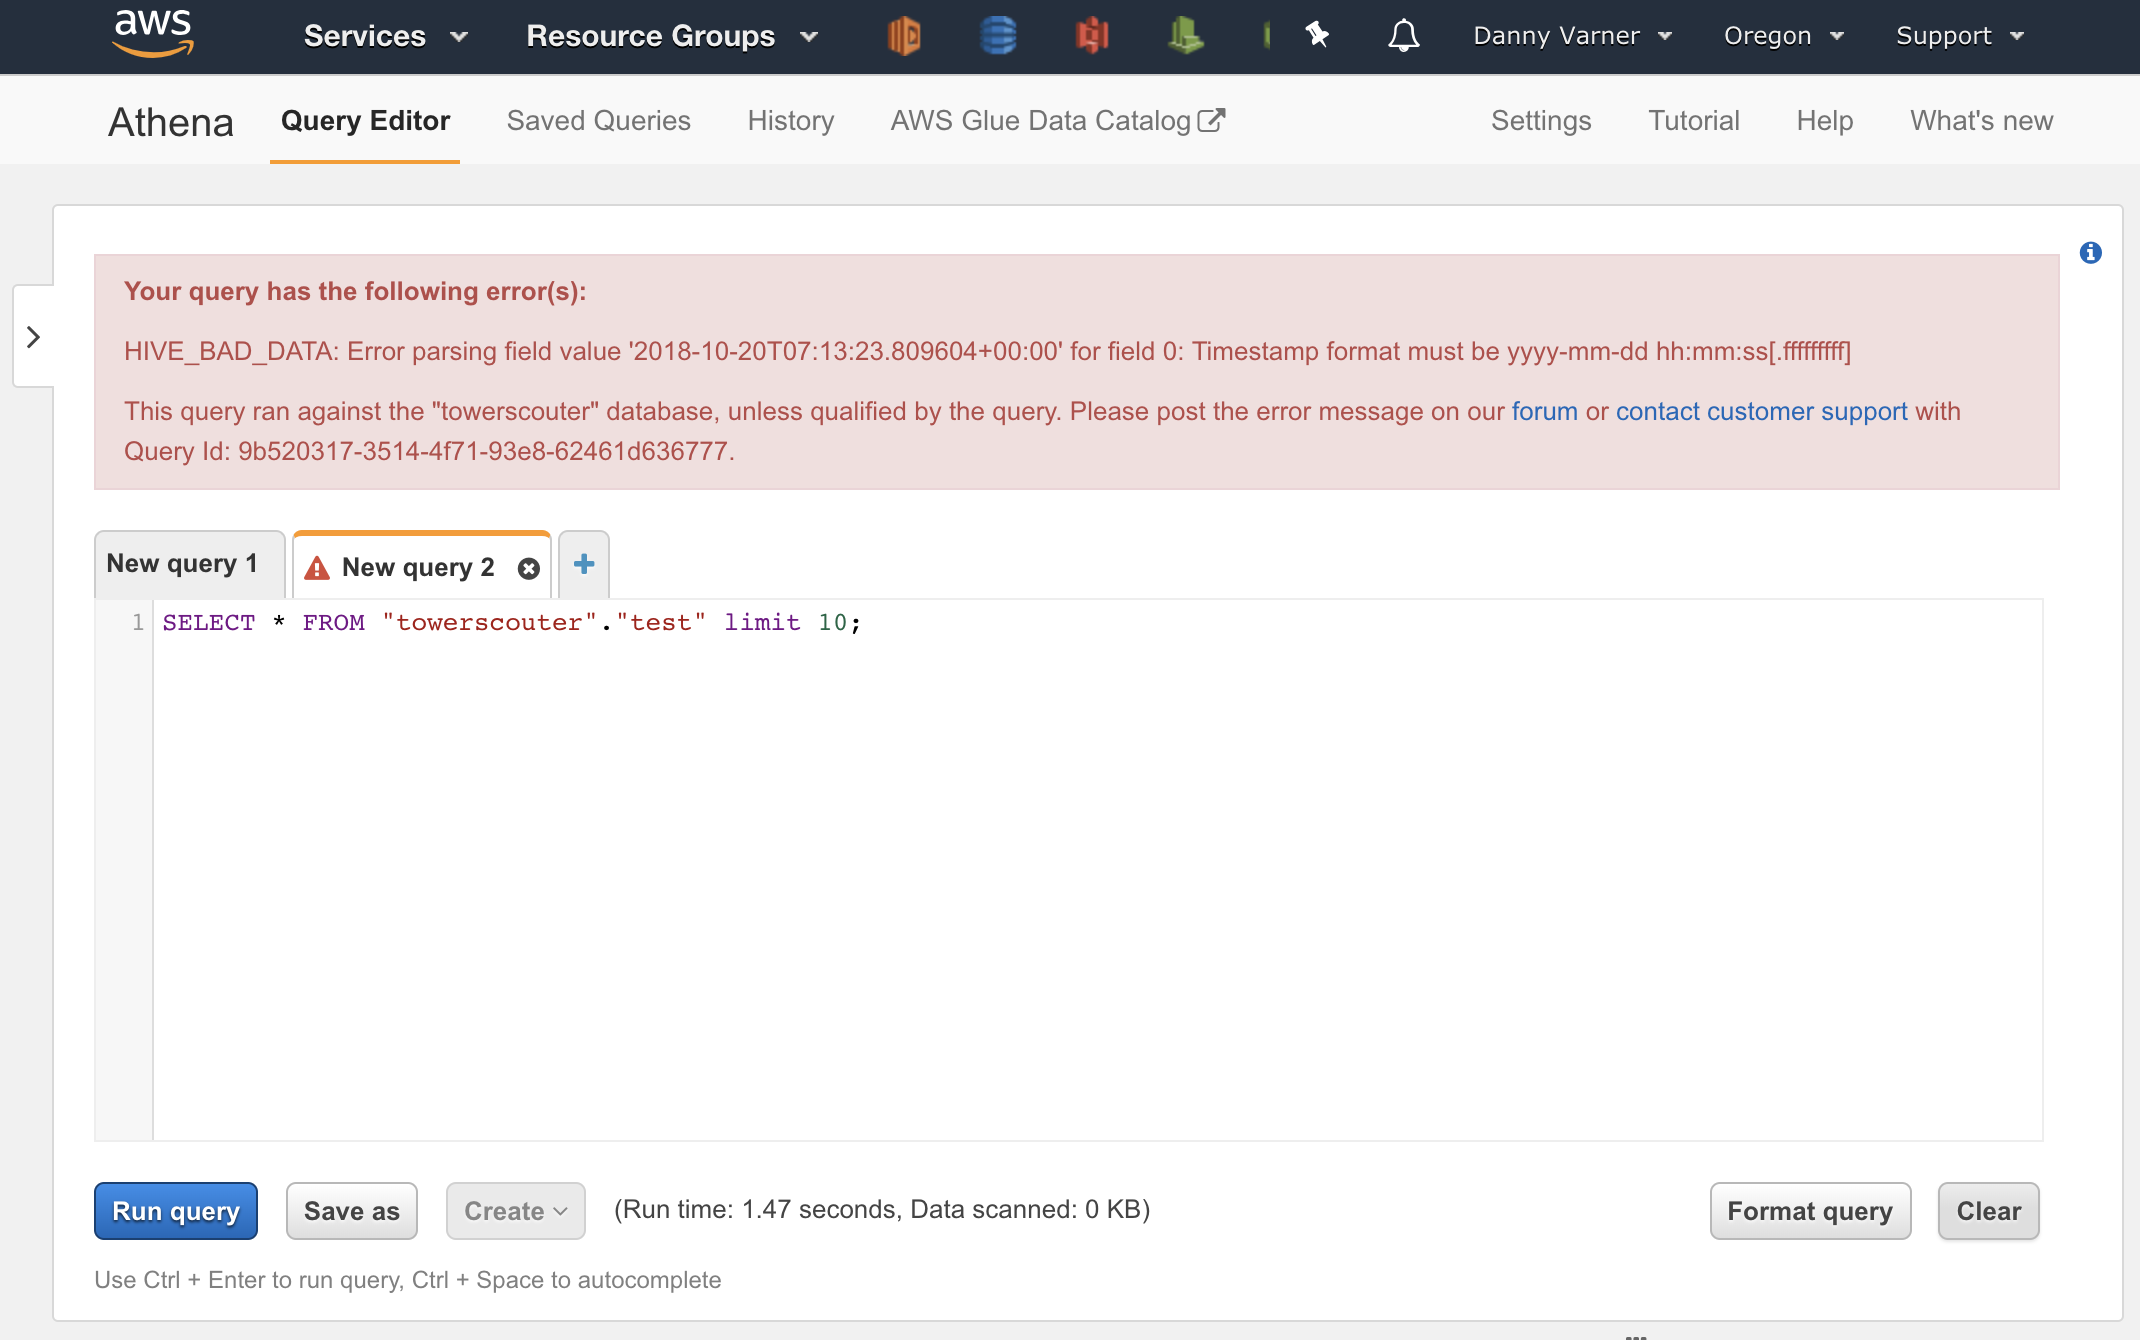
The detected timestamp I’m storing in my event data is in ISO8601 format. Why is that an issue? Before you can write your first query with Athena, you must specify the schema of the data source specifying the expected keys and data types. My initial attempt in defining the schema was to treat the detected field as type timestamp.
Unfortunately the timestamp format expected is in the Java SQL format of yyyy-mm-dd hh:mm:ss not ISO8601 of yyyy-mm-ddThh:mm:ss+00:00. This resulted in runtime errors as the underlying Presto engine couldn’t cast my ISO8601 string to its internal timestamp type.
To get around this, I could just treat the detected type as a string. I could then use date_parse in my query as defined in the
PrestoDB datetime
functions to convert the string to a timestamp at execution time. Although this works, it’s not an elegant solution to parse the date on each query.
Second Issue: Multiple identifiers referencing same data
Recreation.gov performed a major refresh to their website in early October 2018 which included a change to the identifier for all their campsites, cabins and fire lookout towers. This identifier is what I store as the parkId in the json event. As a result of the change to identifiers, my historical S3 events now have two separate identifiers that reference the same lookout tower
Rather than deal with both of these issues at SQL runtime, this can be cleaned up with an ETL (Extract, Transform, Load) process.
ETL with AWS Glue
AWS Glue provides a fully managed ETL service. In this case I’ll be using Glue to perform an ETL process to fix the 2 issues identified in my initial attempt of using Athena directly on my raw availability events.
Step 1: Define the Data Catalog
AWS uses the term “Data Catalog” to refer to the metadata about where your data resides and how it looks. This Data Catalog is conveniently shared across AWS services, so if I setup a Data Catalog table in Glue, I’ll be able to see it and use it in Athena. Actually, when I defined my JSON schema as part of the Athena wizard, it internally created a table in the Data Catalog.
Since AWS Glue is the primary place to edit the Data Catalog, I decided to start fresh and create both a source and target table in the Data Catalog via Glue for the ETL process.
Defining the Source Table
The source table is going to be used for the “Extract” portion of the ETL. The Glue wizard walks you through some simple steps:
- Define the table name.
- Define where the data exists. In this case, the existing S3 bucket where my analytics data resides.
- Define what type of data it should expect. In this case, JSON.
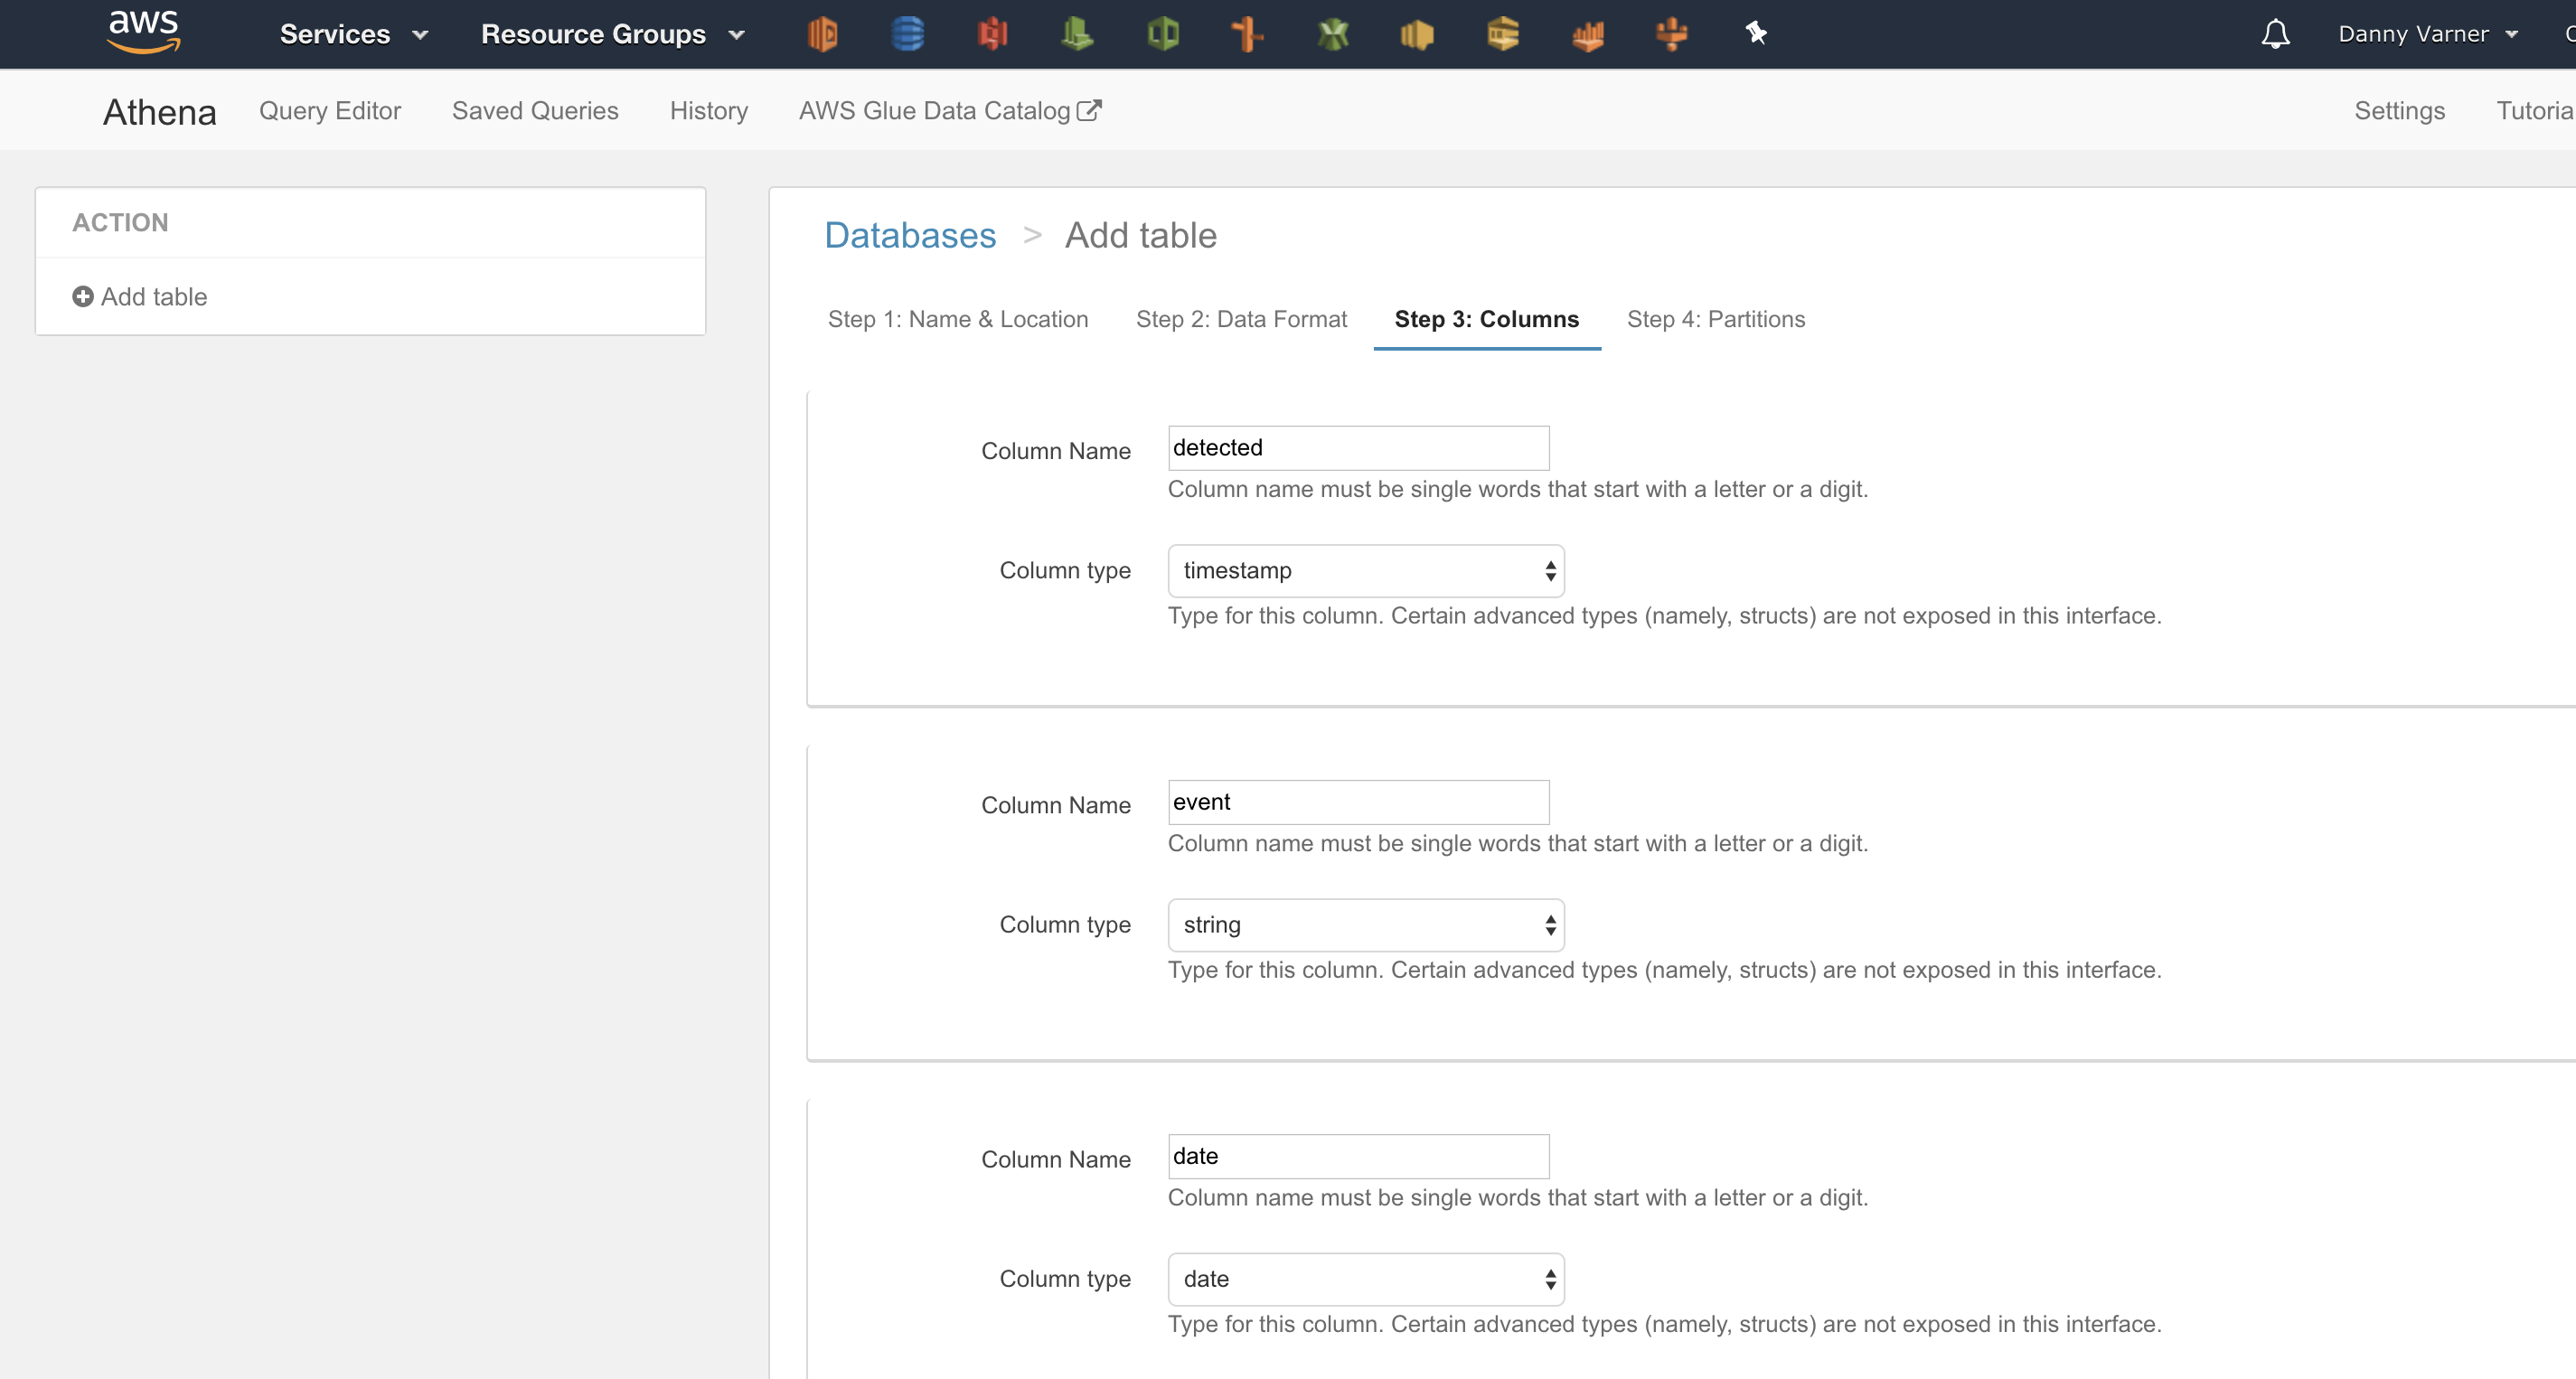
- Define the schema of the data. In this case, it’s the same as we defined in Athena, but I want to be sure to choose ‘string’ as the type for the ISO8601
detectedtimestamp to not run into the same issue as we ran into earlier. I’ll convert the string to the proper format to be parsed as atimestampin the “Transformation” step.
Defining the Target Table
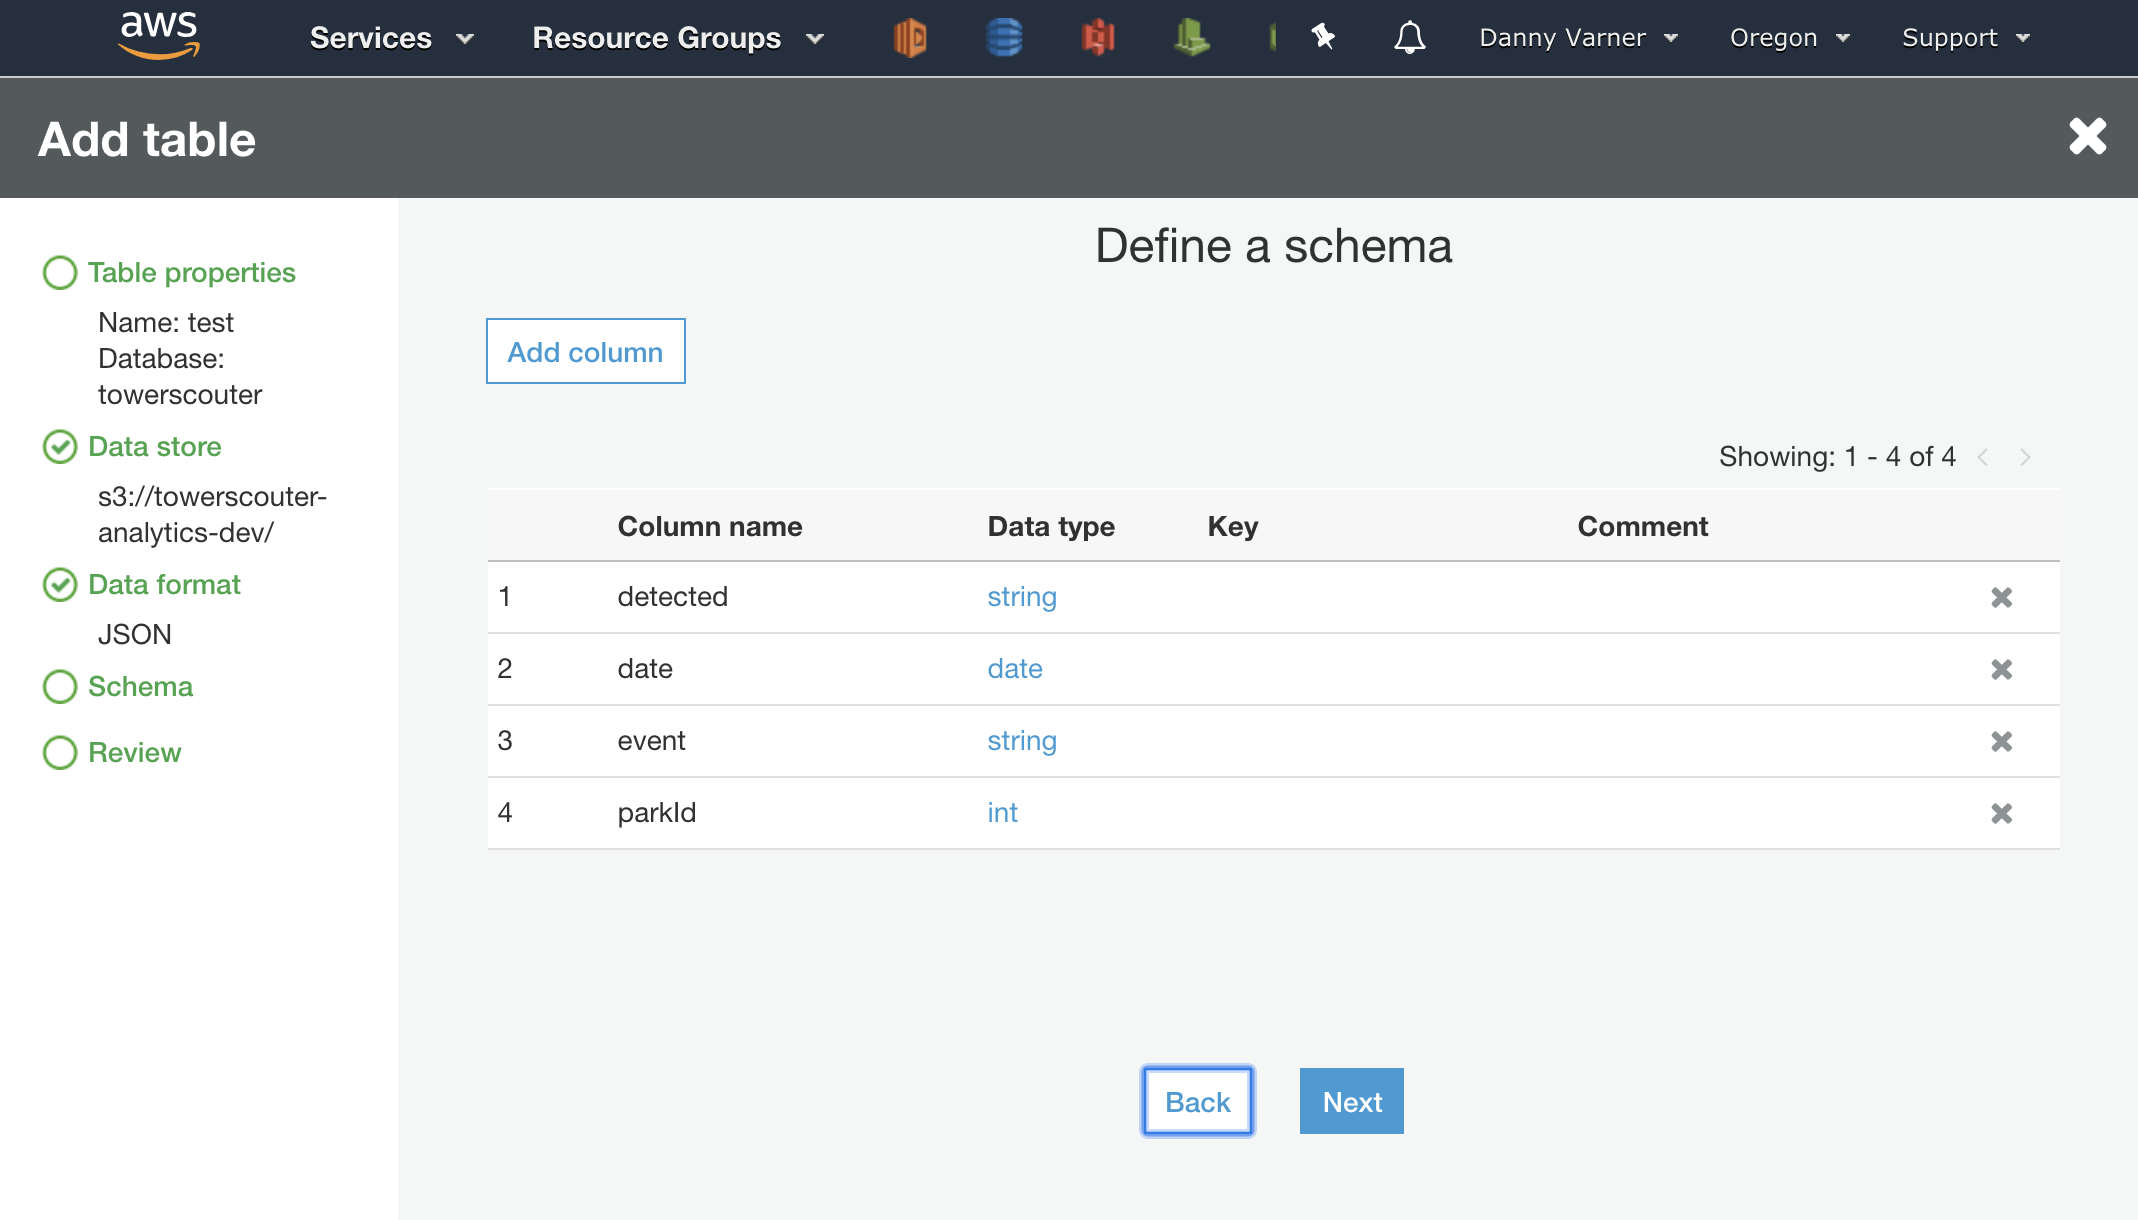
The target table is going to be used for the “Load” portion of the ETL, the final state of what I want the data to look like after transformation. I’ll follow the same steps:
- Define the table name.
- Define where the data exists. I’ll create a new empty S3 bucket to store the transformed data.
- Define what type of data it should expect. I could specify an optimized format like Apache Parquet or Apache ORC that would enable Athena to churn through the data more efficiently. To keep things simple though, I’ll just stick with JSON.
- Define the schema of the data. I’ll take the opportunity to also rename some of the keys to be more descriptive, I’ll also be sure to set
detectedas a timestamp as I’m expecting the transformation step will have changed the format to be in the Java SQL format.
Every table created in the Data Catalog via Glue will automatically show up in in Athena as a data source. If I were to query this table in Athena now I’d get zero results as there is no data in the S3 bucket that it points to. The next step will be to write the ETL script that takes the Source Table (Extract), performs the cleanup (Transform), and Loads it into Target Table (Load).
Step 2: Create The ETL Script
The first thing I attempted was to create the script using the AWS Glue wizard that’s available when creating a new “Job”. This wizard allows you to select your language (Python or Scala), allows you to choose your data source and data target (which we already defined), and allows you to do some basic mapping of types. The mapping of types here use the AWS Glue ApplyMapping Class which is intelligent enough to convert the ISO8601 string to the timestamp type.
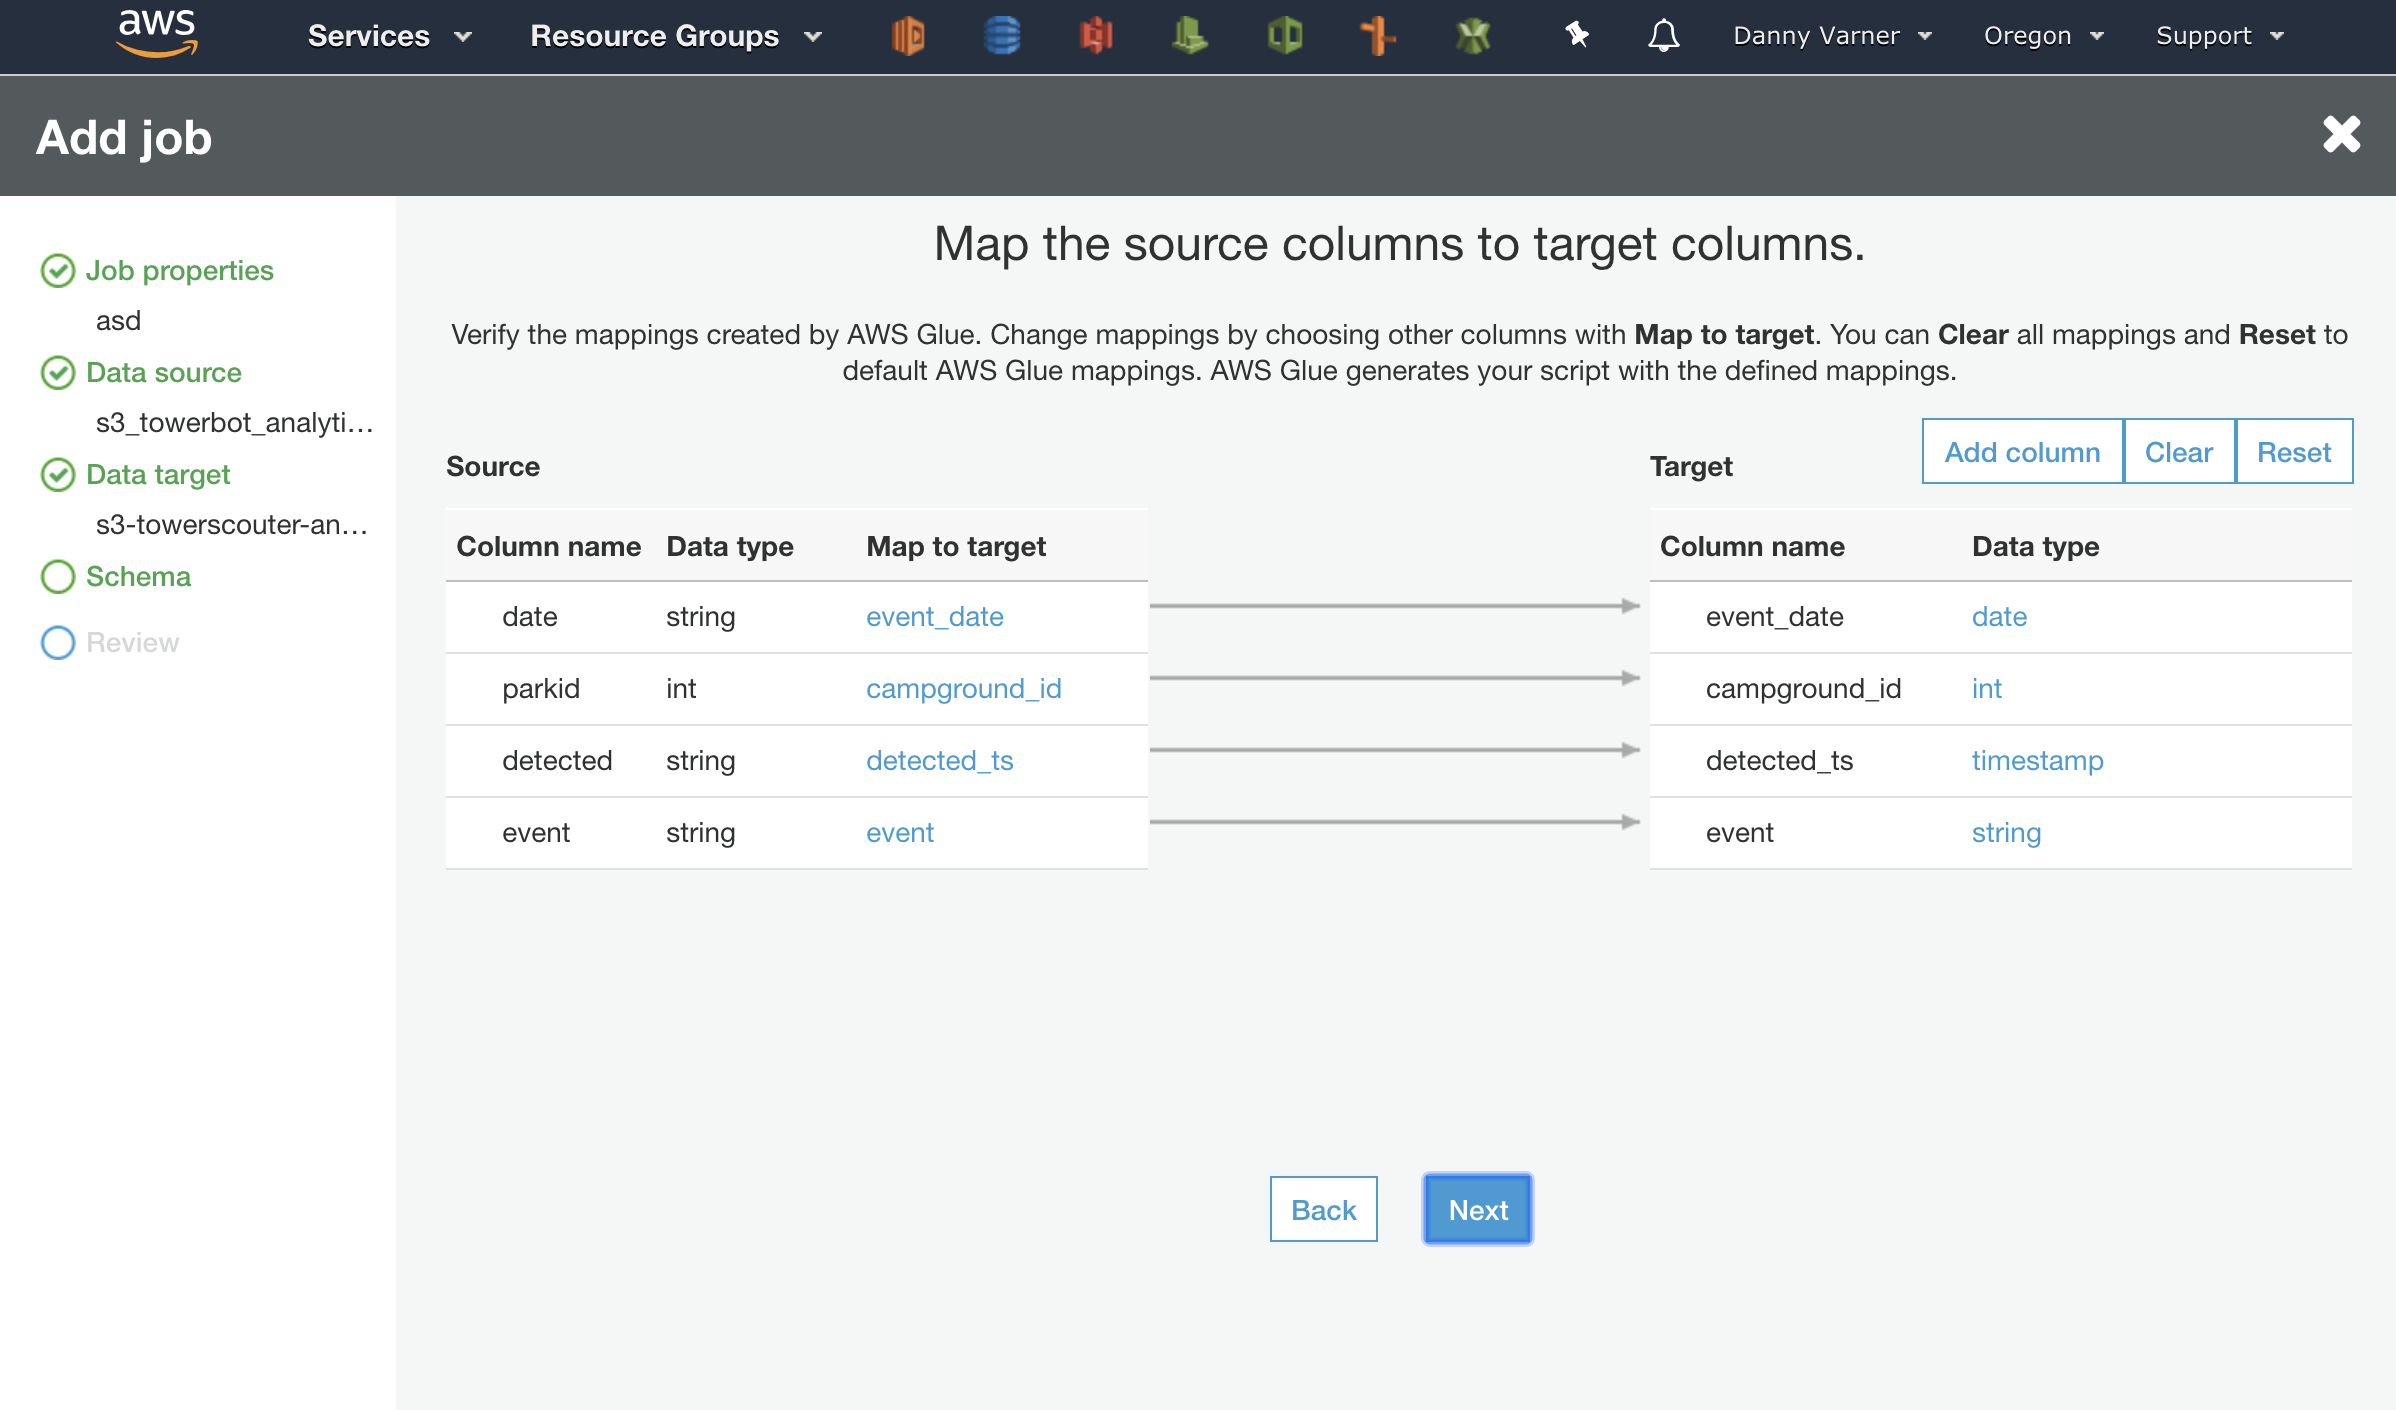
As the wizard finishes it will bring up a basic text editor to edit the Glue generated script.
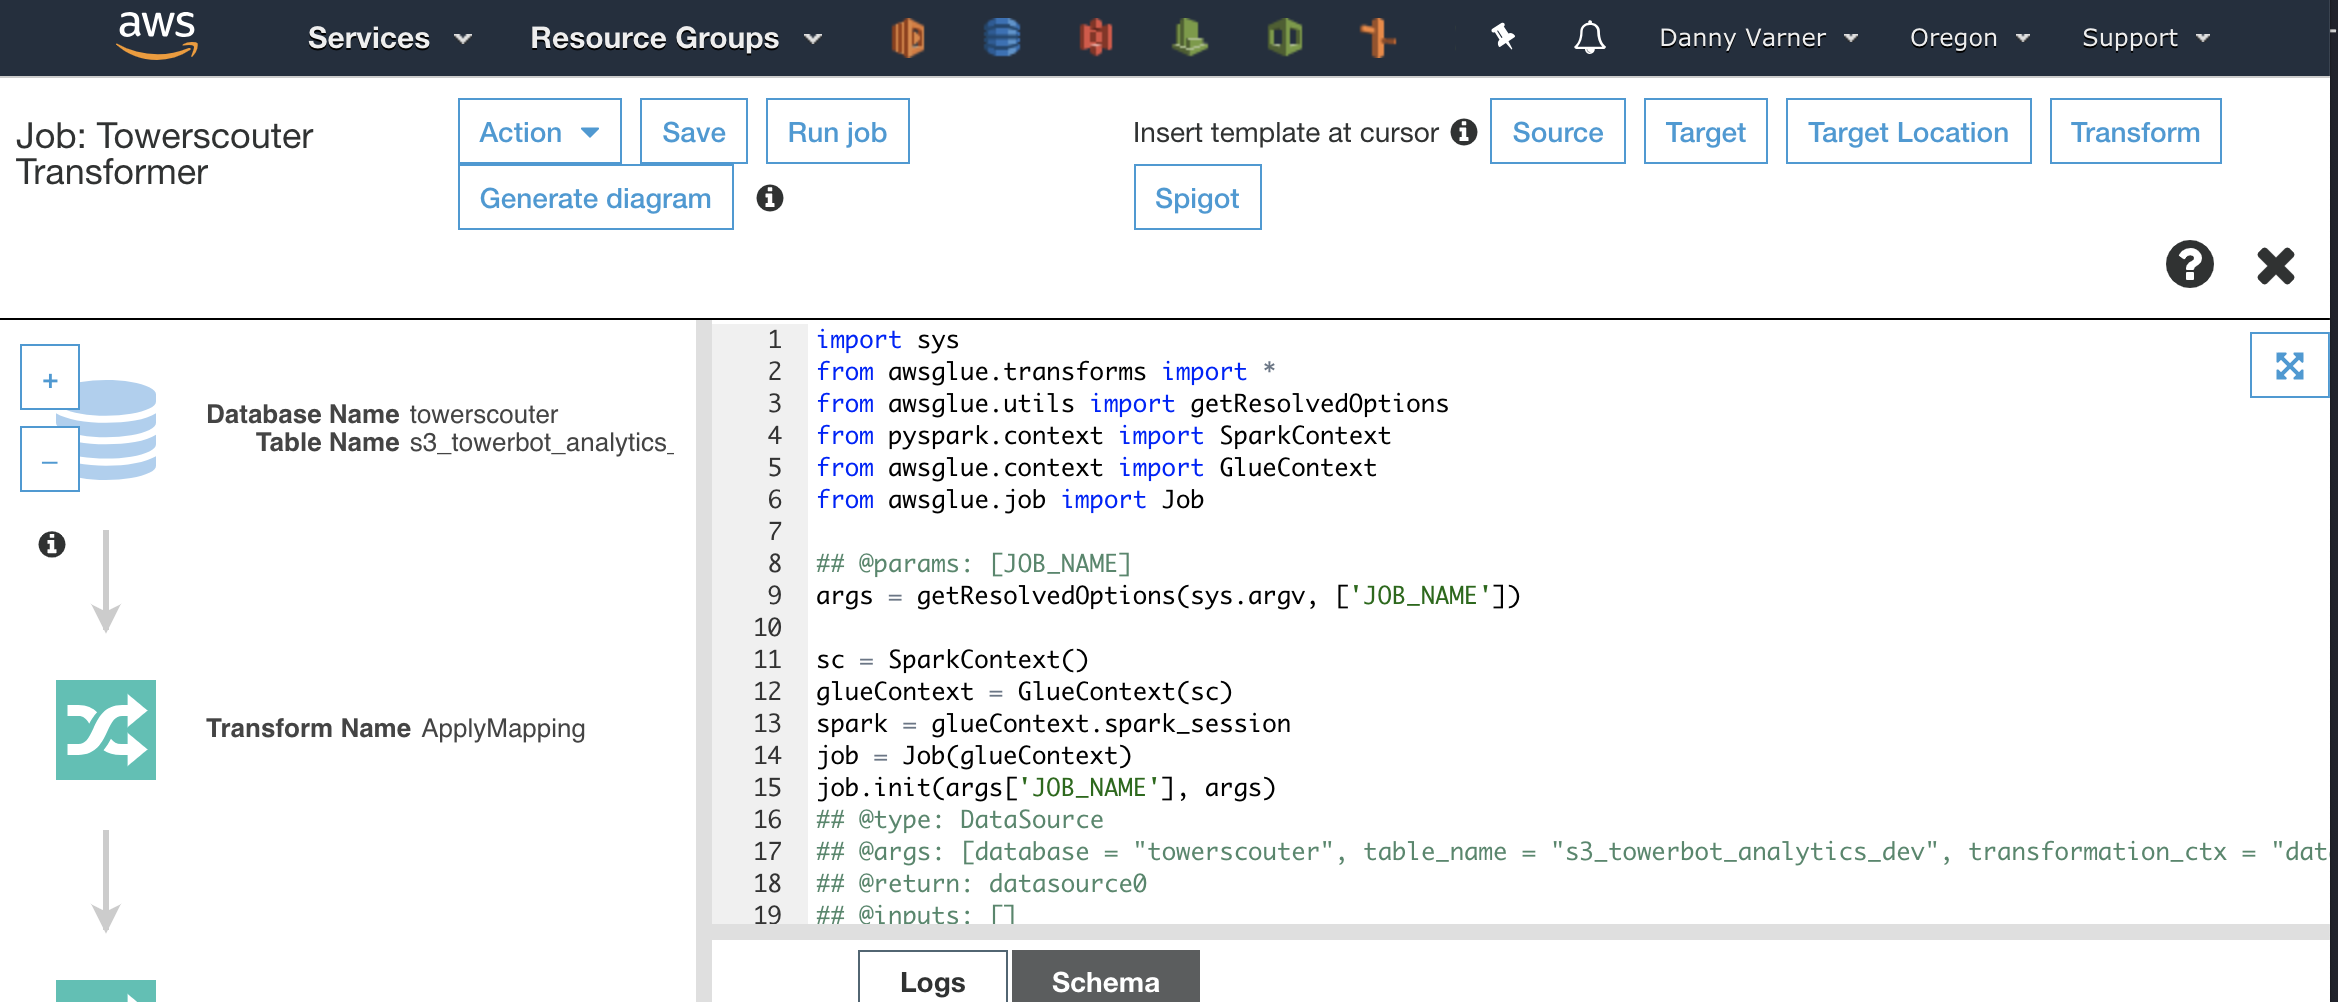
This script will work out of the box to solve the first issue I wanted to tackle with the timestamp types. However, I’ll need to do some manual tweaking to add the transformation for the second issue of having multiple identifiers for the same lookout tower. At first I tried just editing the script and running the job to see if I could make it work. This is NOT an efficient way to get the ETL script working as:
- Running a job isn’t instantaneous. The job is submitted to an internal queue, I found it took 5-10 minutes before my job got executed by Glue.
- Running a job isn’t cheap. Although jobs are billed by the second, there is a 10 minute minimum.
If you are like me and have a very high likelihood of introducing a syntax error with each line of code written, there are going to be MANY executions of the job until it is working as desired. Fortunately AWS Glue has a great built-in solution to avoid waiting 5-10 minutes for feedback and facing a bill for each syntax error. Let’s look at yet another service, Amazon SageMaker.
Step 3: Modify and Debug the Script with SageMaker
Amazon SageMaker provides multiple helpful tools for the data scientist. The one that is of interest when writing Glue ETL scripts is the SageMaker service to spin up a cloud hosted Jupyter notebook that can seamlessly connect to the needed ETL resources. What’s really slick is that Glue has a tight integration with SageMaker allowing the notebook to be created and connected to the data catalog tables all without leaving Glue itself. Here’s how to do it:
Create a Dev Endpoint
Within Glue, there is an option to create a “Dev Endpoint”. This Dev Endpoint will give access to the execution engine and the S3 data source that I’m using.
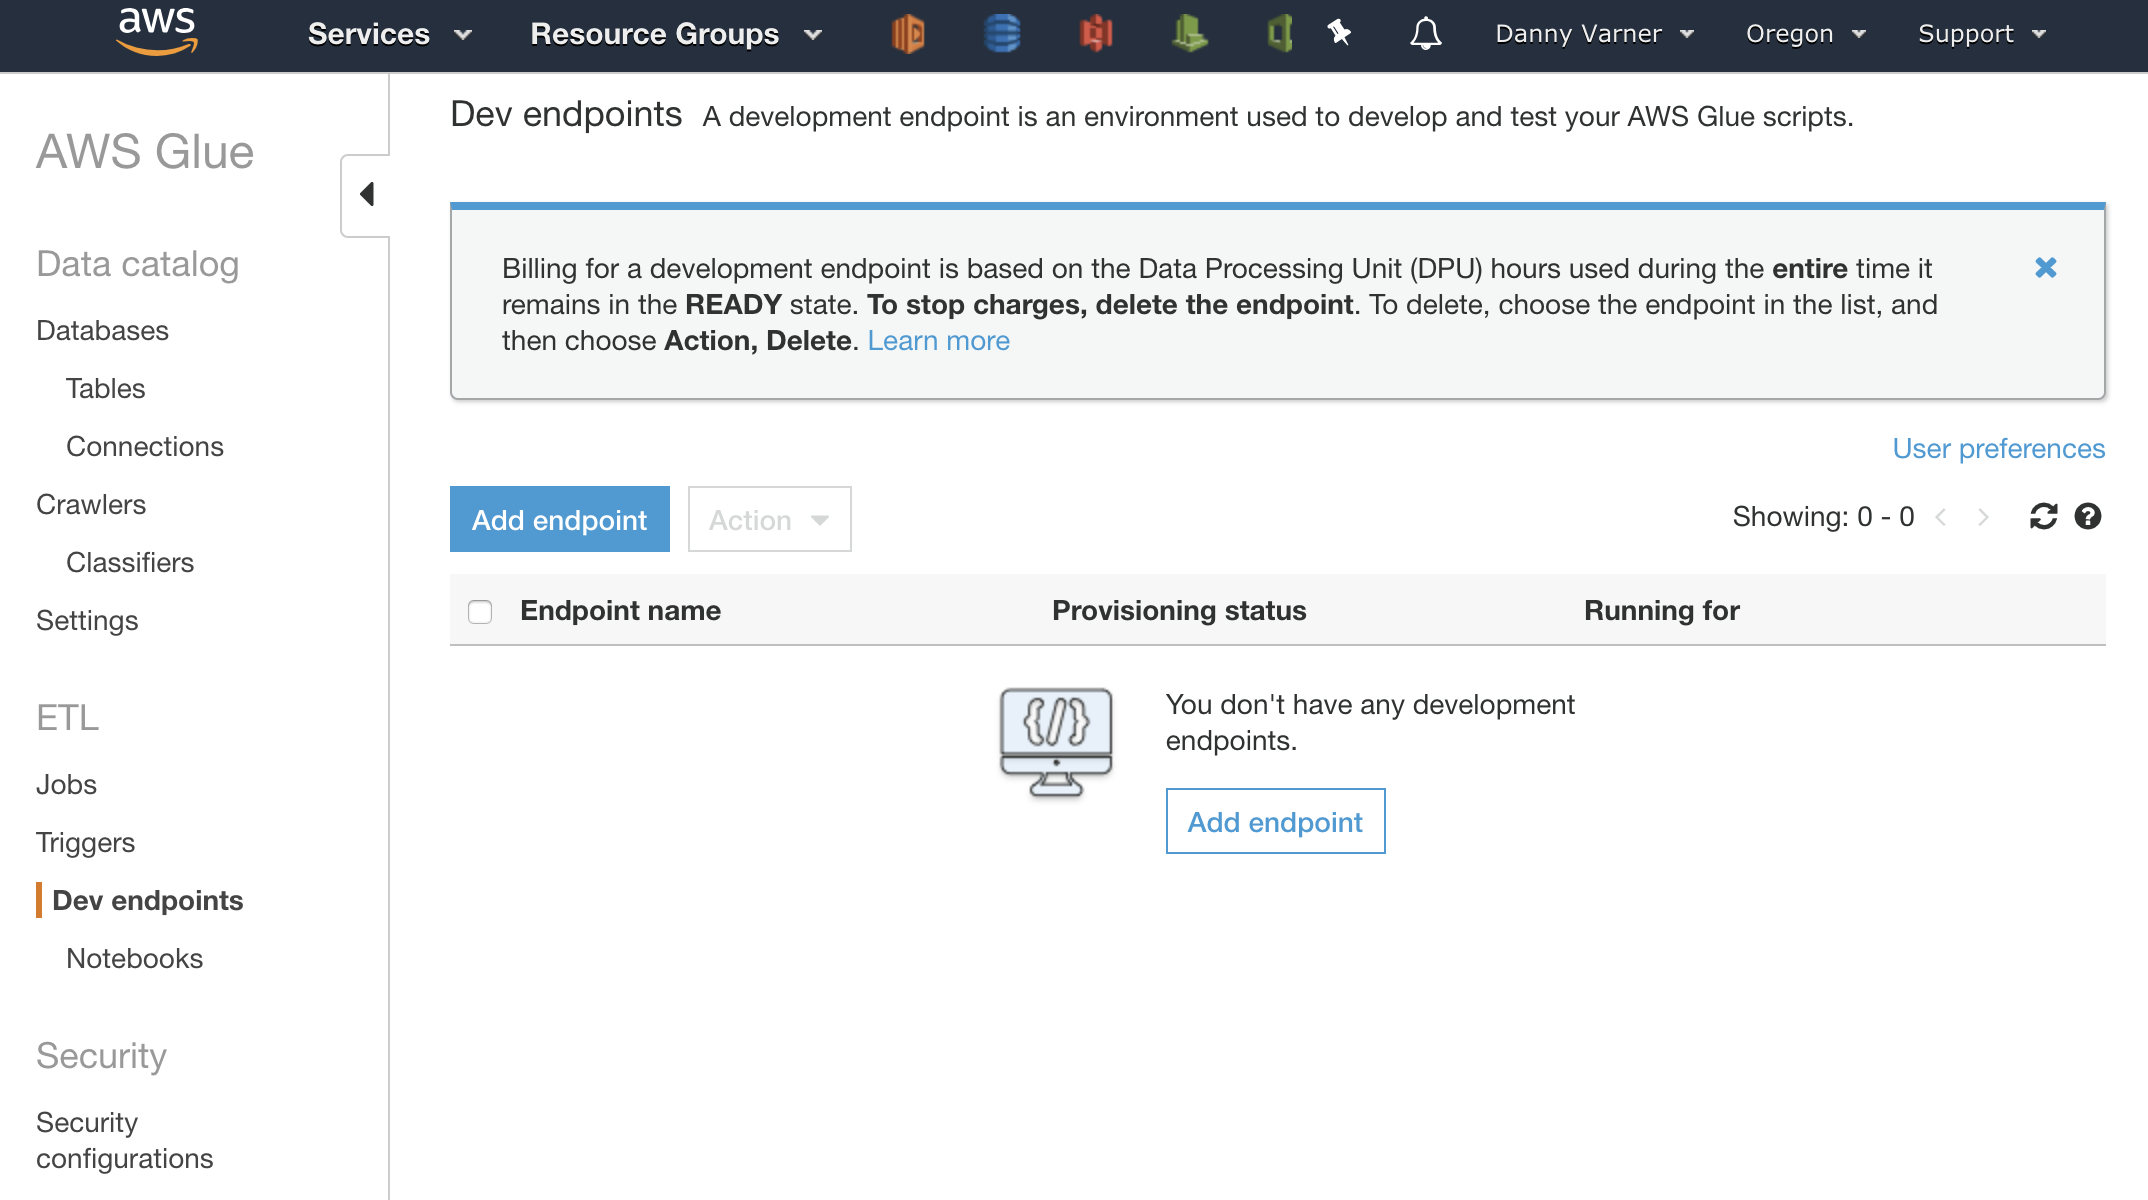
Creating an endpoint is just another click through wizard. It provides some options for creating an SSH key for connecting to the endpoint from a local IDE or notebook and also an option for custom networking to access data sources within a VPC. In this case I can skip creating an SSH key as I’ll be connecting to the endpoint via SageMaker and I can skip any custom networking and I’ll just be accessing data in S3 so I don’t need VPC access.
Create the SageMaker Notebook
Once the Dev Endpoint is created, there is an option to create a SageMaker Notebook and auto connect it to the Dev Endpoint. Once the Notebook is created I now have a fully functional cloud Notebook to debug and test within.
Finish the Script
Now that I had a fast feedback loop being in an interactive notebook, it was much more pleasant finishing the script. I fixed the syntax errors, learned the intricacies of how to interact with Glue’s data structures and classes through trial and error, and finished the cleanup of my data. This resulted in a functional and runnable script that fixed both of my initial data issues.
Step 4: Trigger the ETL Glue Job
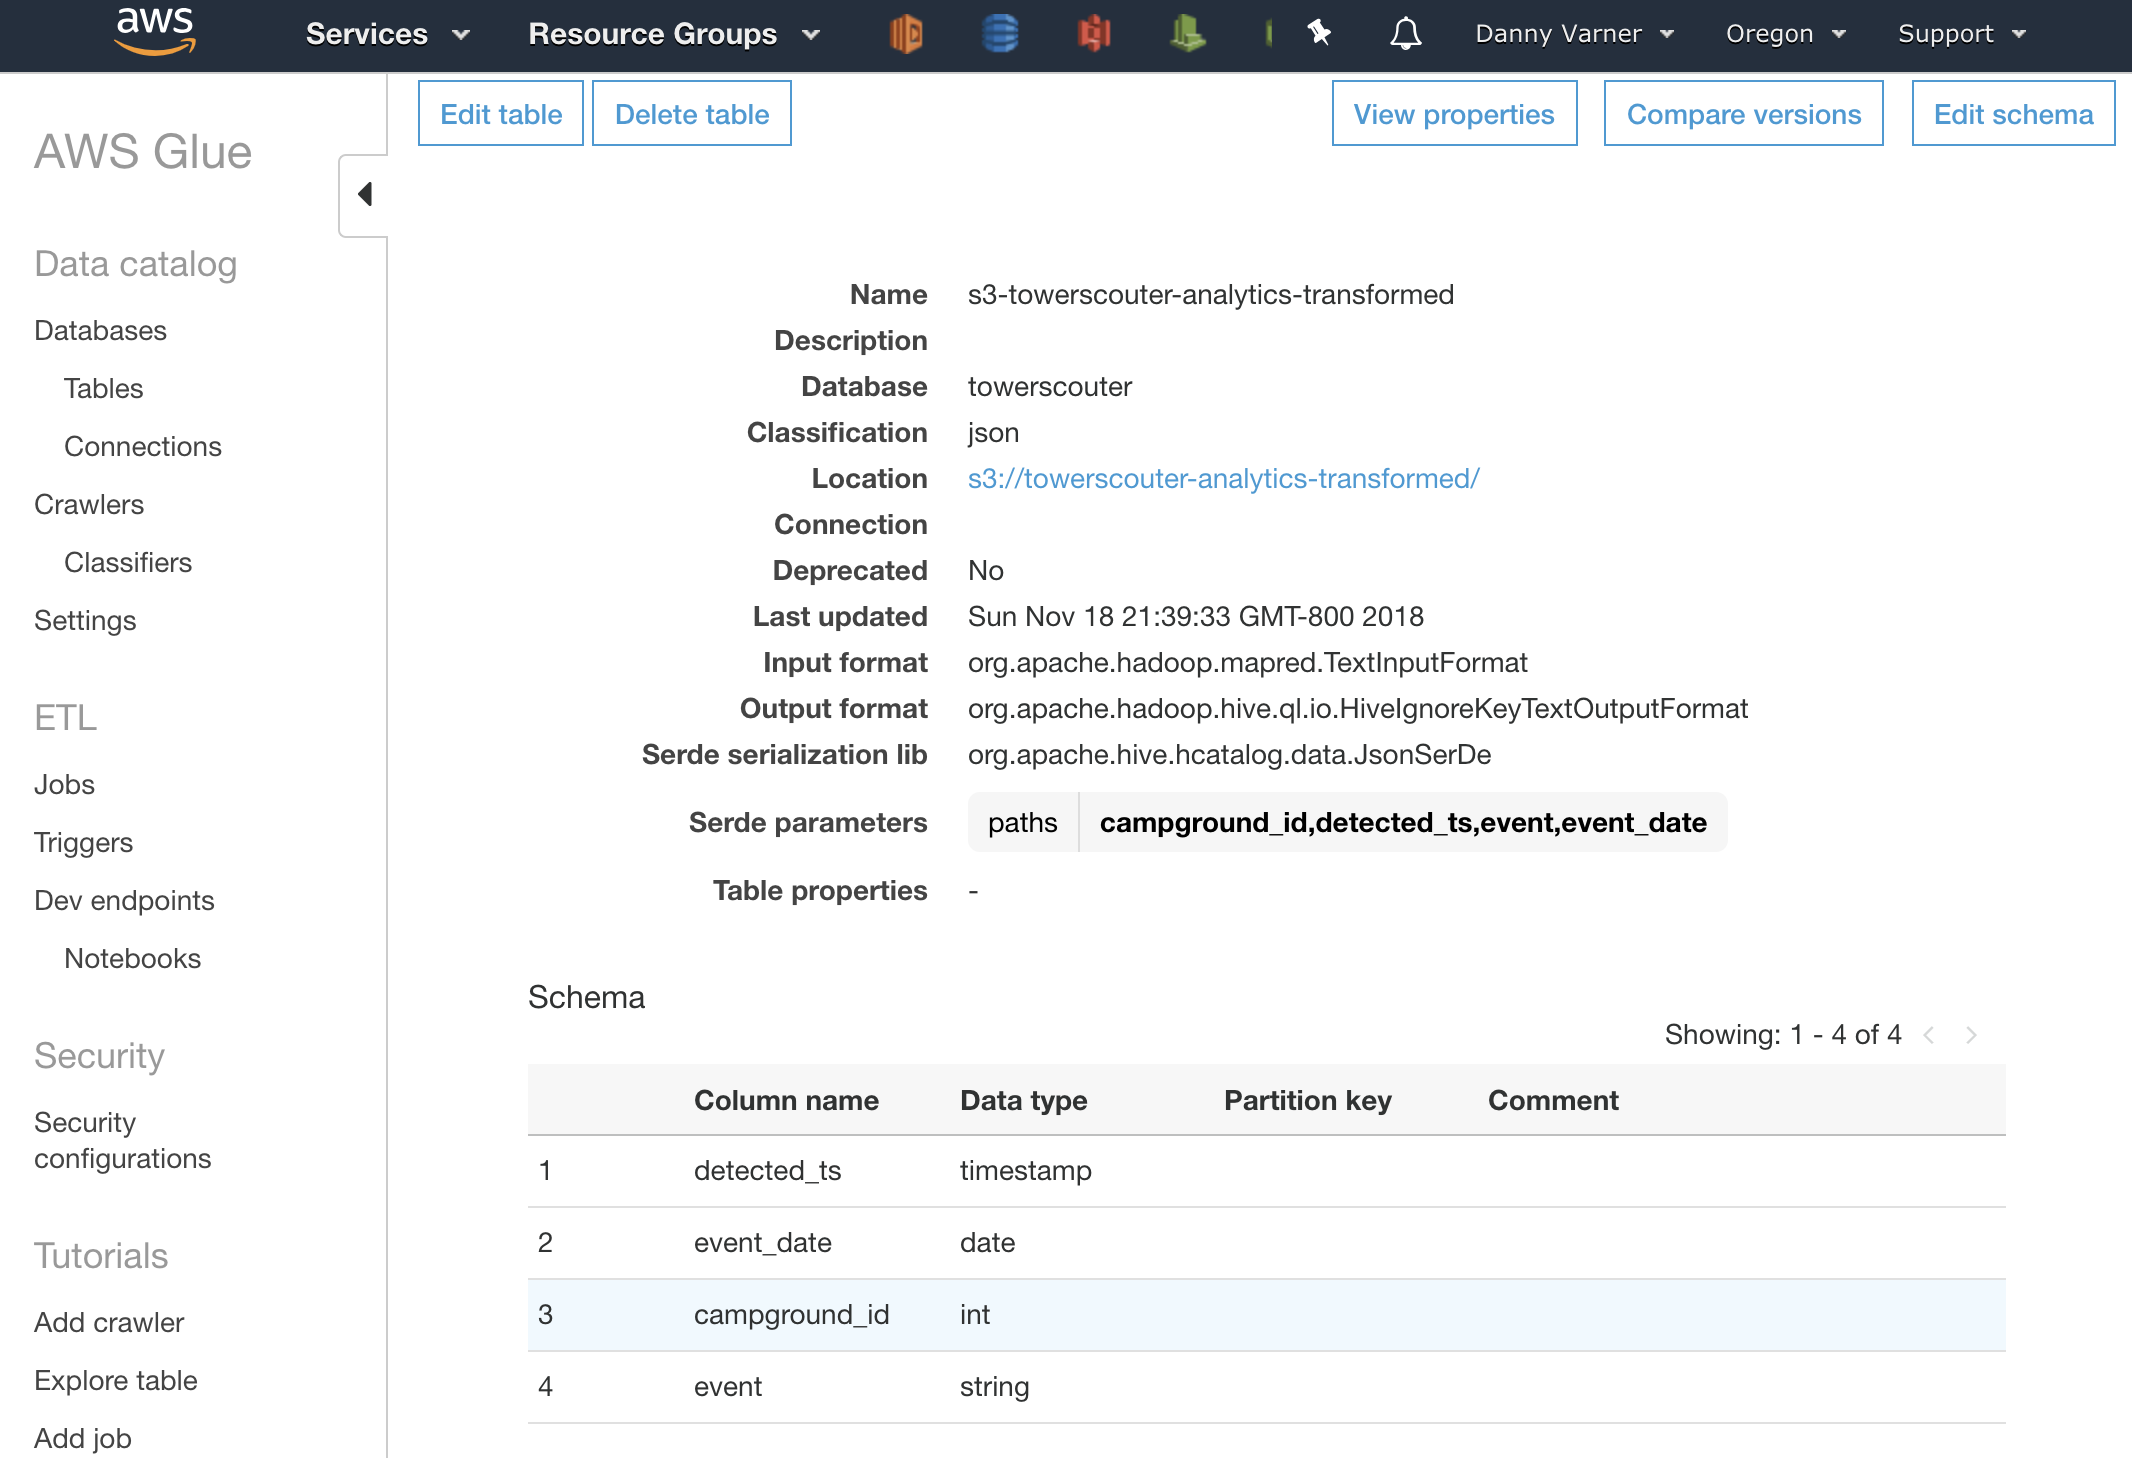
I copied the script from the notebook into the original Glue Job I created in Step 2 and was now able to run the ETL job successfully. When finished, the S3 bucket defined in the target table of the data catalog was populated with ‘cleaned’ events. Here is the same availability event as referenced earlier for a Timber Butte Cabin availability, now with a new parkId and a new format to to the detected timestamp string that can be interpreted as a datetime type by the internal deserialization library.
{
    "event_date": "2019-03-20",
    "campground_id": 233133,
    "detected_ts": "2018-09-20 23:51:22.7278",
    "event": "add"
}
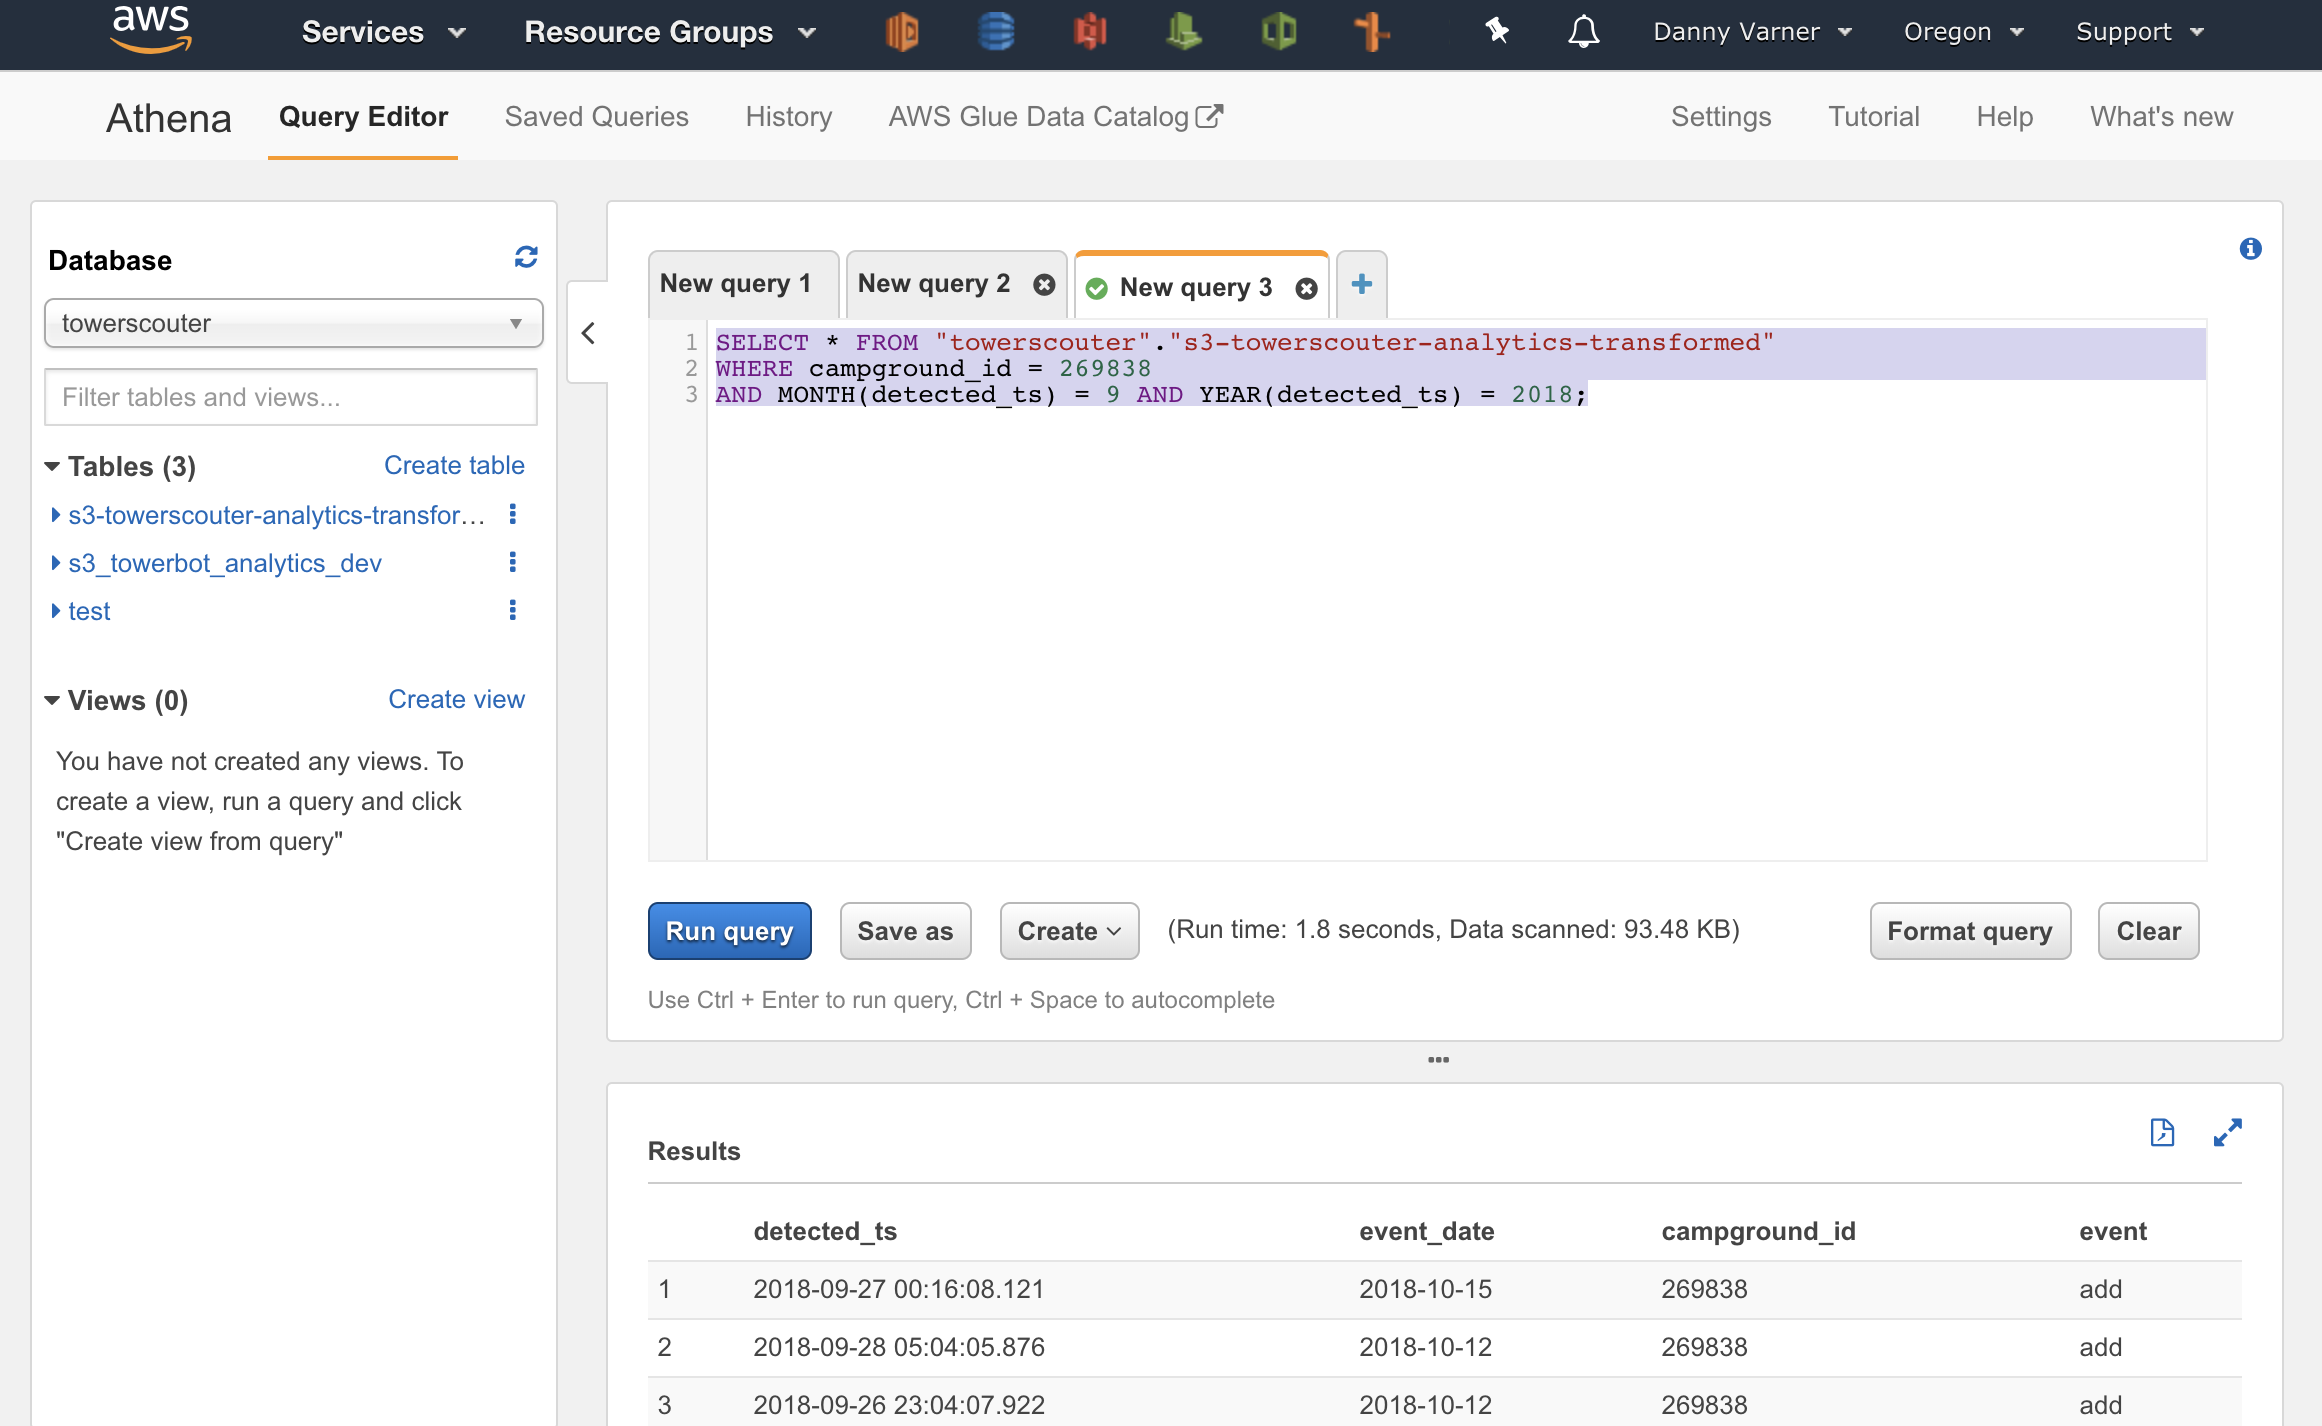
Step 5: Run Athena Queries on the Transformed Data
Jumping back into Athena at this point I’m ready to start running SQL queries. Since the Data Catalog tables defined in Glue are shared across services, the new table is already ready for me to select in Athena that will use the new S3 bucket with the transformed data.
One Weird Thing
When I ran queries on the cleaned data, the date field returned from the Athena SQL queries were just bonkers. Despite having properly formatted dates in the current year of 2018 I was seeing dates 100s of years into the future. Bonkers.
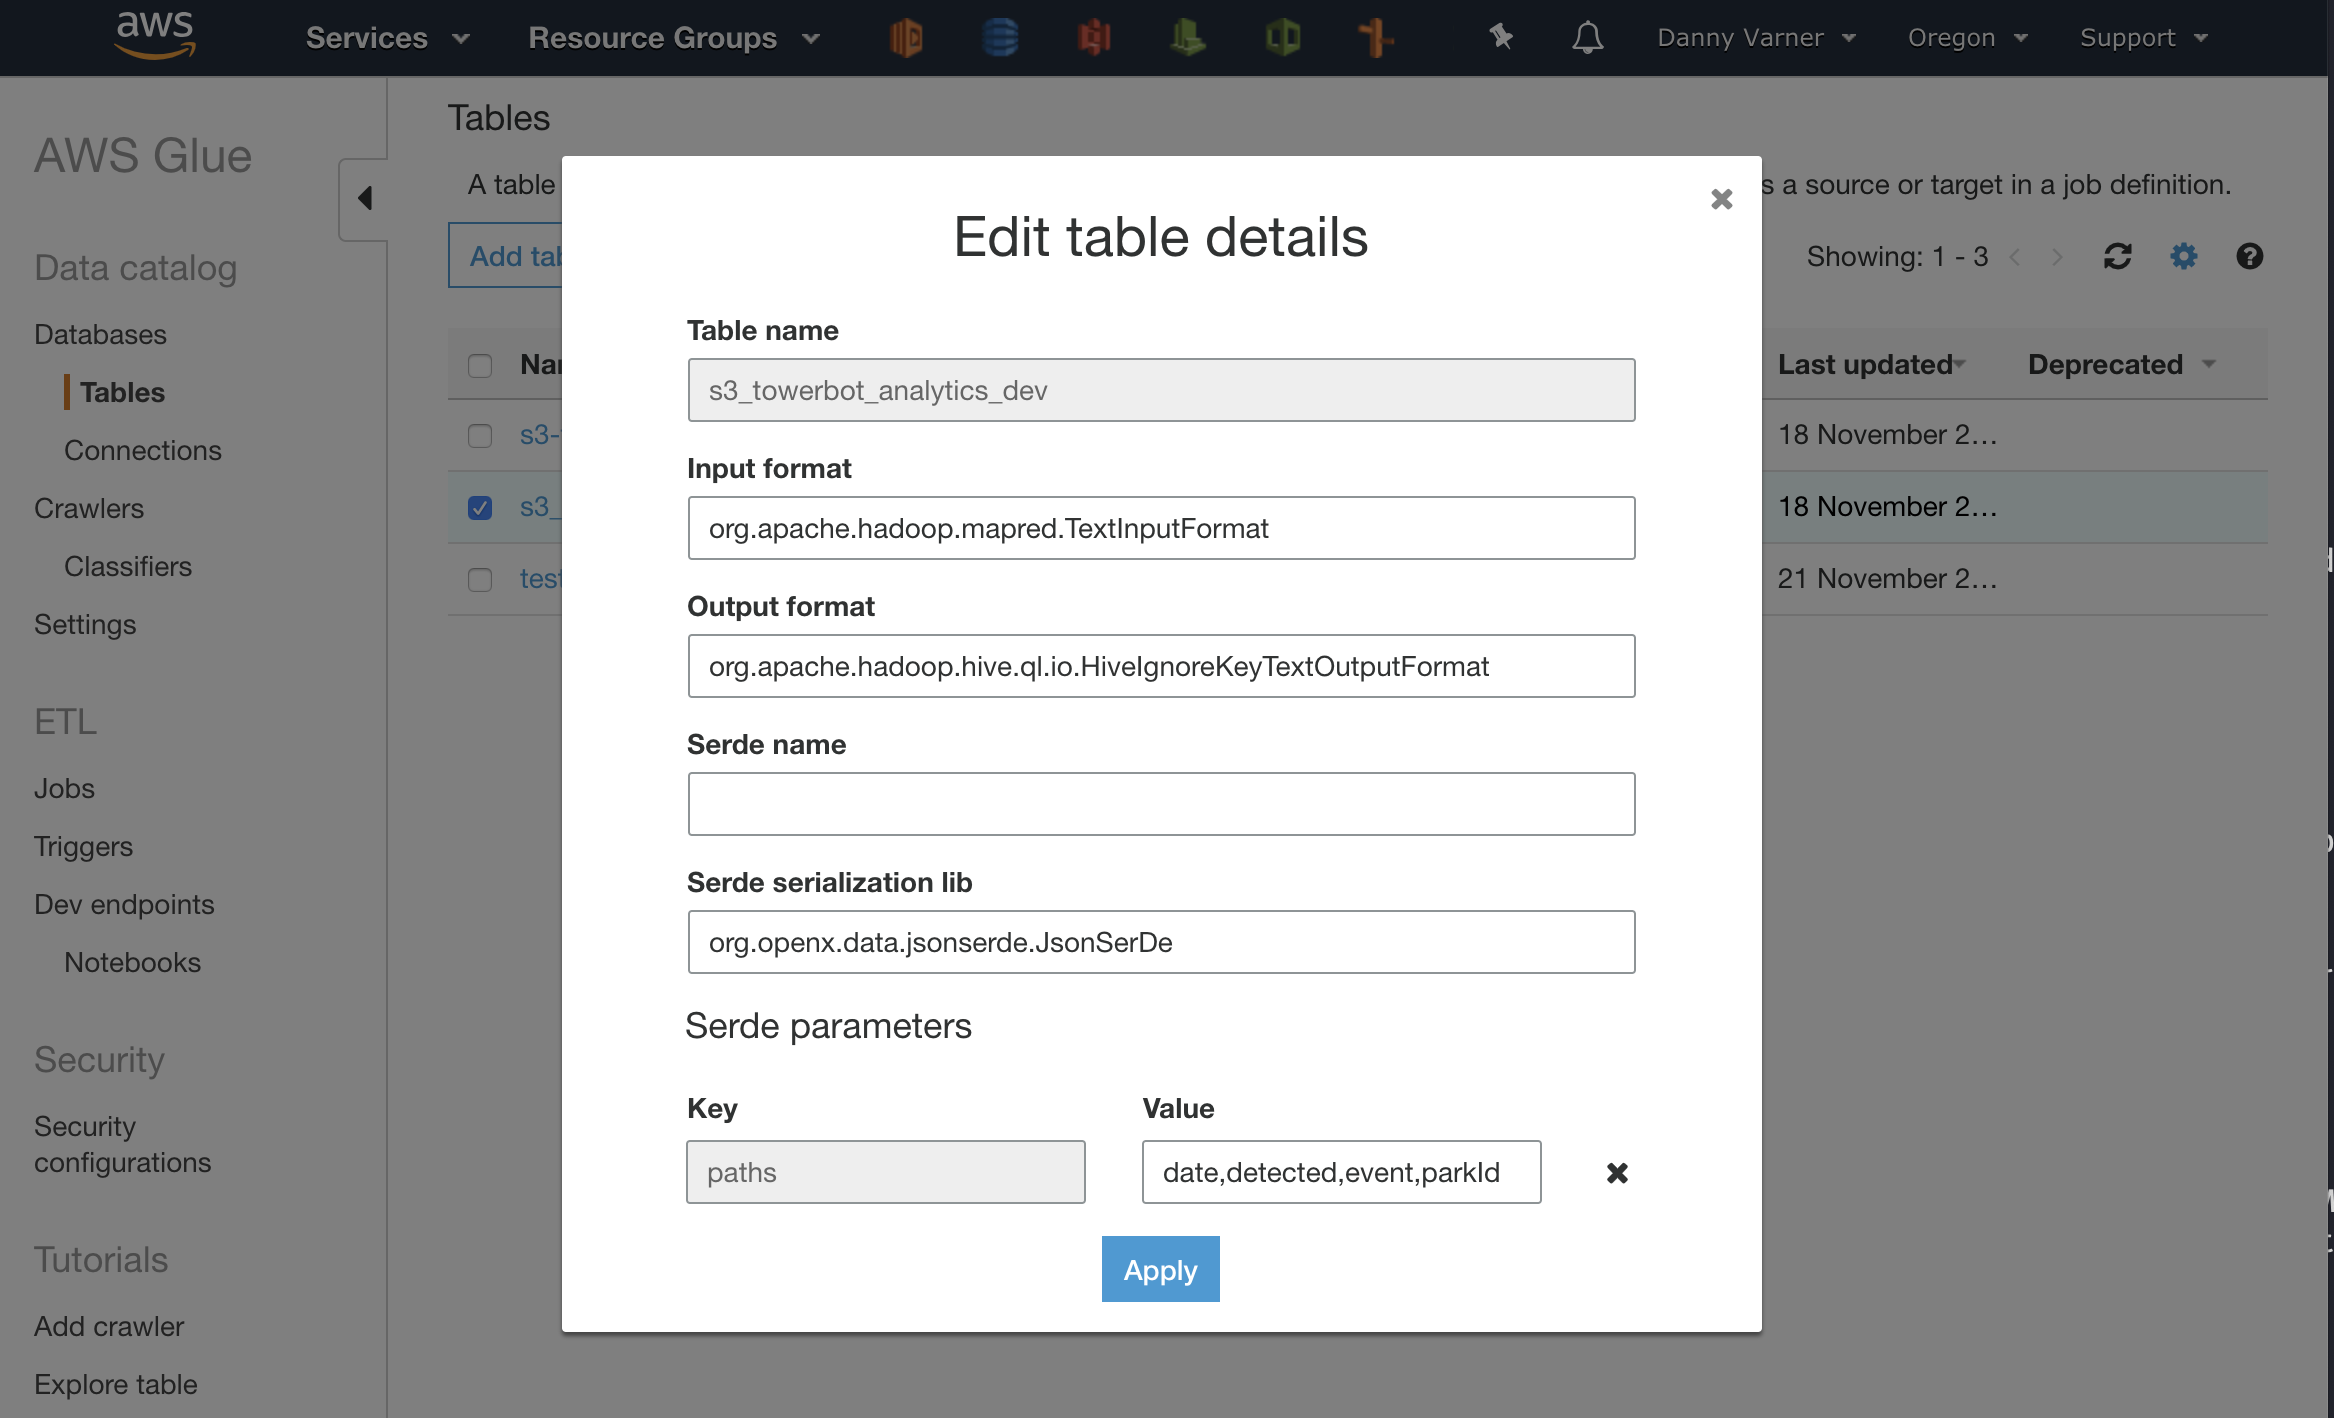
The fix? Change the serde (serialization/deserialization) library in the data catalog table from the default of org.openx.data.jsonserde.JsonSerDe to org.apache.hive.hcatalog.data.JsonSerDe. For some weird reason, the default openx serde lib can’t properly read in dates from JSON files. Ugh.
Conclusion
With Glue and SageMaker I was able to create a simple ETL pipeline that cleaned up my raw analytics data stored in S3. With the cleaned up data I could then use Athena to run interactive SQL queries on my data despite not having a running database.
In the end I paid $3.64 for the Glue ETL time and nothing for Athena execution time. This could have further been reduced quite a bit if I had just created a SageMaker Notebook to debug my ETL script earlier avoiding the 10 minute minimum billing of submitting many buggy ETL jobs to Glue.
As a hobbyist with side projects that are run out of my own pocket this is super exciting. It amazes me with how much can be done in AWS without needing to pay for a server running 24/7.